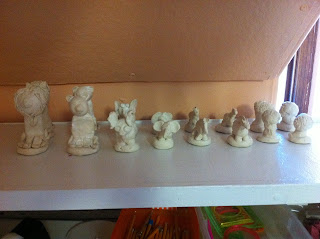
Safari Chess Set
GRADES 5-7
The original idea for this great project was from the blog:
A HUGE thank you to Julie Voigt at art for small hands for being so generous in posting this and many other amazing projects in such great detail. I am constantly amazed and extremely grateful for this blogging community!
This sold last night at our silent auction for $375.00, I was thrilled, it was the second highest selling item at the auction. (First was a kindergarten painting/collage that I will post next).
DAY 1:
We spent the entire class coming up with an idea.
I explained all of the pieces in a chess set and how many of each we would need. I took all of the ideas and wrote them on a paper & we voted - Safari was the winner. We then came up with ideas for the king, queen, bishops, knights, rooks & pawns.
before day 2, I wrote down all of the pieces that we would need, what sizes they needed to be and assigned a student to each piece, they needed to work in groups to assure that they pieces matched each other in shape and size:
2 Kings - Lions - 4" each
2 Queens - Lioness' - 3 1/2" each
4 Bishops - Elephants - 3" each
4 Knights - Zebras - 2 1/2" each
4 Rooks - Safari Trees - 2" each
16 Pawns - Snakes - 1 to 1 1/2" each
all pieces were to be able to fit in a 2" square, I gave them 2" squares of paper for reference
I made printouts of each animal so that the students would have a visual reference. I placed these in plastic sleeves.
DAY 2:
We discussed how to use the clay. Slip, Scoring etc.
We used Crayola Air Dry Clay because our school does not have a kiln.
I assigned groups and we began sculpting. The two students making kings sat together, the two students making lionesses sat together etc. - they had their animal printout in front of them.
I also had 2 students in each class working on just making bases for the animals to sit on. I gave those students bottle caps to ensure that all of the bases were a similar size. They rolled the clay into 1/2" slabs and cut the bases out with clay tools.
At the end of day 2, I covered all of the pieces with lots of damp paper towels and a sheet of thick plastic. I arranged to have my students come in for an extra art class the following day. They finished sculpting and we attached all of the animals/trees to the bases by scoring and slipping. We took floral wire and put a few pieces into each animal/ tree. The lions had two pieces of wire going from their heads to their bases. The elephants had the same and pieces in their trunks and ears. After the students left, I continued to add more wire and make sure that the pieces were all solid.
Note: the air dry clay shrinks a bit so keep this in mind when adding the wire, some of our wires ended up showing through the top and bottoms, we painted them and it was not a big issue. We ended up putting felt on all the bottoms so that the clay and wire would not scratch the board.
DAY 3: Finish sculpting. At the end of this day, I covered all of the pieces with damp paper towels and plastic again. I slowly, over the next two weeks, began to loosen the plastic & remove paper towels. After 2 weeks they were just about dry. The slower the pieces dry, the stronger they will be and they won't crack. I am happy to say that I had not one crack. Some of the pieces did separate slightly from the bases, but were secure because of the wire. In these spaces I stuck some slip in and let them dry over night. This along with some extra acrylic paint acted as glue.
I went to Home Depot & picked out a piece of pine shelving. They cut it to size for me 19 x 19". Once the pieces were dry, I measured them and realized that they would need a 2 1/4" square instead of a 2" square. I knew that this may happen so, I waited until all of the pieces were dry to decide on what size chess board I would get. 19x19" allowed for the 2 1/4" squares and a 1" border around the entire playing area. I primed the board:
Before day 4, I worked out a color scheme for each side. They needed to be different enough so that you could easily know which pieces were yours while playing.
DAY 4: Paint. Again, the students sat together to make sure that their pieces were either painted exactly the same or different, depending on which side of the board they were going to be on. One side had bases painted a light brown, the other side green. We used acrylic paint. I instructed the students to paint a the largest areas first and not to add any detail.
Two students painted the entire board green.
The board got a second coat of green paint later that day.
DAY 5: I had a student who is particularly good at measuring draw out the squares on the board. The tan squares were painted on the board and details were added. The tan squares received a second coat later in the day. Once dry, I sprayed all of the pieces and the board with an acrylic sealer.
DAY 6: Students signed the back of the board in Sharpie, we snapped a few photos and it was off to the auction!


